How to Clean Generator Carburetor in 10 Steps At Home
Just like the air filter and spark plug, the carburetor also needs to be cleaned to operate efficiently otherwise, the generator will either will have a surging problem and incomplete combustion, or it won’t start at all.
A clean generator carburetor is essential for smooth and efficient operation. In this guide, we will walk you through the steps of properly cleaning your generator’s carburetor, so you can keep the power flowing without interruption.
This article will help you to understand How to Clean Generator Carburetor using a few basic tools without any professional help.
How to Clean Generator Carburetor in 10 Steps?

Tools Need for the Cleaning:
Things to be taken care of before starting the cleaning process:
QUICK STEPS
Step 1: Locate the Carburetor:
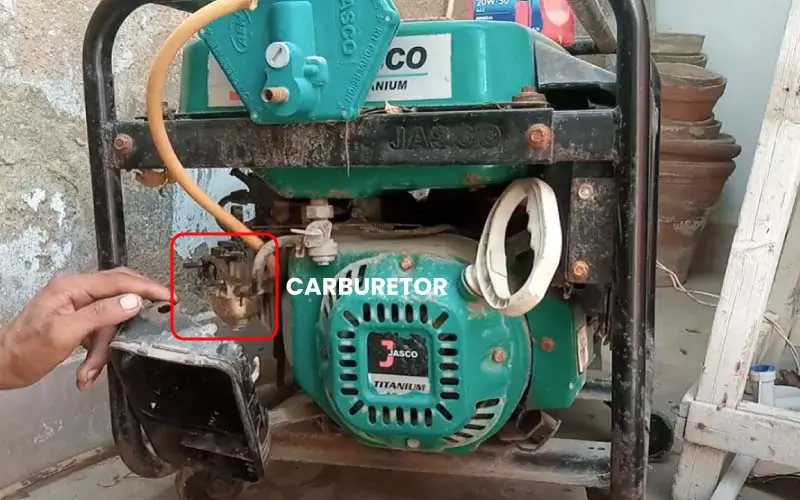
The carburetor is typically located on the side or top of the generator’s engine. It may be covered by a small plastic or metal cover that can be removed with a screwdriver. Once the cover is removed, you should be able to see the carburetor clearly.
Step 2: Turn OFF the Fuel Valve:
You don’t only need to turn off the fuel valve, but you will also need to drain the excessive fuel. For inverter generators, user manuals will tell you how to do it, but for the open-frame generators, just turn off the fuel valve.
Step 3: Disconnect the Fuel Line:
Use the nose plier and unclip the fuel line. Now examine the gasket. If you notice and crakes, replace it with a newer one to avoid any fire hazard.
Step 4: Disconnect the Carburetor:
Inverter generators have electronic throttle control on top of the carburetor with a plastic body. Use a socket wrench or pliers to remove these and carefully remove the carburetor from the engine.

In old open-frame generators, you will find a governing rod and a spring that should be removed first before the carburetor.
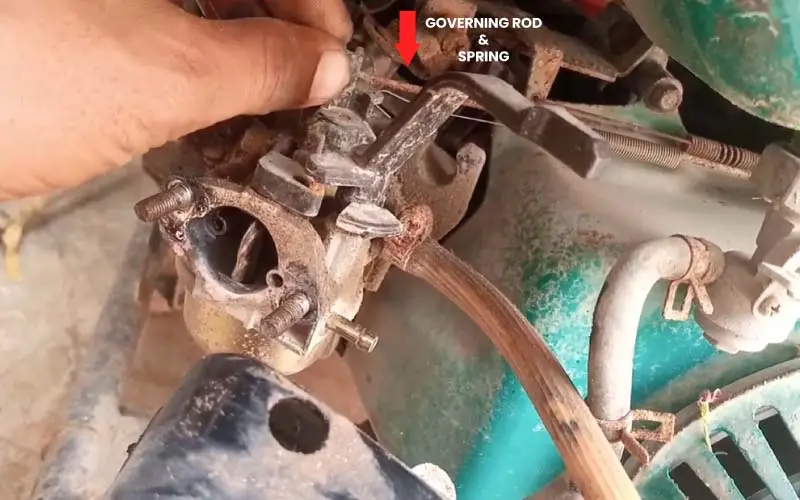
Now wear a pair of gloves and safety goggles. Use the carb cleaner I mentioned earlier and cleanse the surface (body). Make sure to remove any debrief of dirt.
NOTE: Fore inverter generators, remove the electronic throttle first before removing the carburetor.
For open frame generators, slightly move forward the carburetor, now remove the governing rod and spring in the last.
Step 5: Clean the Flowing Bowl of the Carburetor:

There is a float bowl bolt at the bottom of the carburetor, unscrew it. Don’t remove the drain accidentally. Apply a few sprays on the bowl and clean any dirt or debris.
Make sure to keep a bowl or tray with you where you dump all the bolts, screws, and pins.
Note: If the gaskets that seal the flow bowl and carburetor display any cracks, I would advise replacing it.
Step 6: Clean the Float Pin, Float/Flow and Flaot Valve:
The float is easy to locate. It is inserted inside the flowing bowl. Remove it. Now you can easily remove the float valve as well.
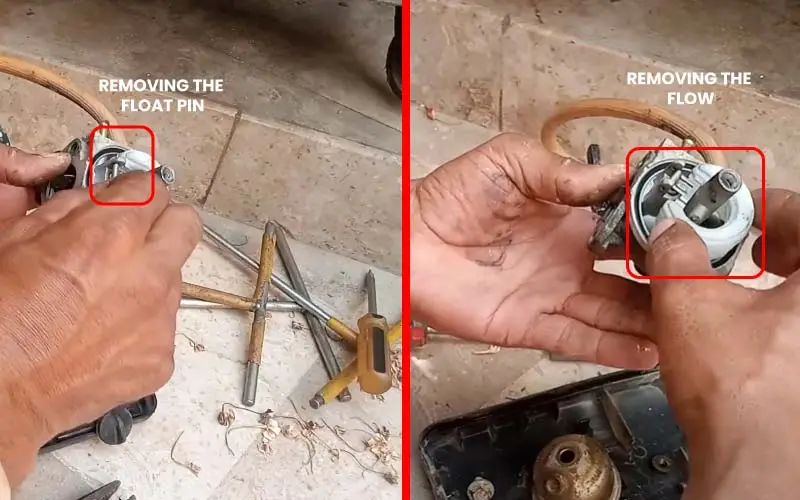
Use the carb clean and both of them as well. Dip the cotton bud in the carb cleaner and use it to the flat valve.
Inspect the float valve in detail. If you notice cracks or holes, replace them immediately. It could be leaking fuel.
Step 7: Clean the Main Jet and Nozzle:
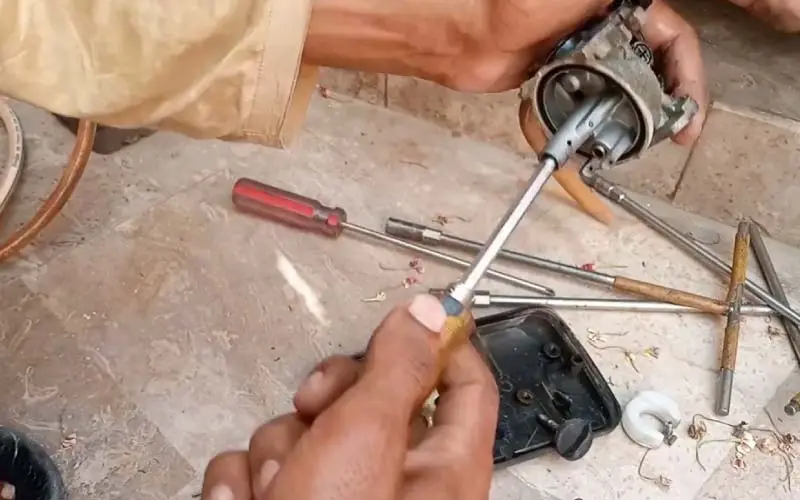
The main jet is located inside the center post (hole). You will need a flathead screw to remove it.
There are a lot of small holes in the body of the main jet and nozzle. Apply a few sprays of carb cleaner through those holes.

Get one thread of copper wire and clean those holes properly. Blow compressed after the cleaning process. You can also use a hair dryer or a blower if you don’t have the means to blow compressed air.
Note: If the main is positioned on the side of the center hole, it should be moved toward the center.
Step 8: Clean the Pilot Jet:
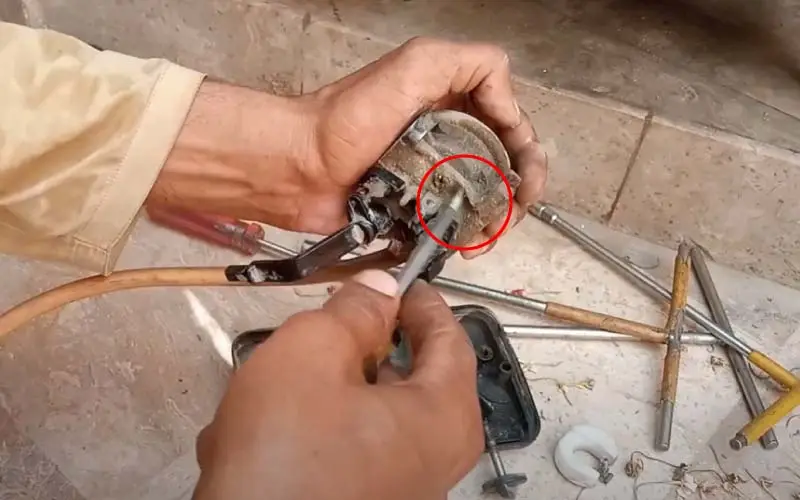
The pilot sits behind the idle screw. Unscrew the idle screw and pop up the pilot jet using a flathead screwdriver.
Like the main jet, the cleaning process of the pilot jet is also the same. Use one thread of copper wire, carb cleaner, and compressed air. Be as gentle as possible. Pilot jets are fragile.
Step 9: Clean Air Passages and Inner Body:
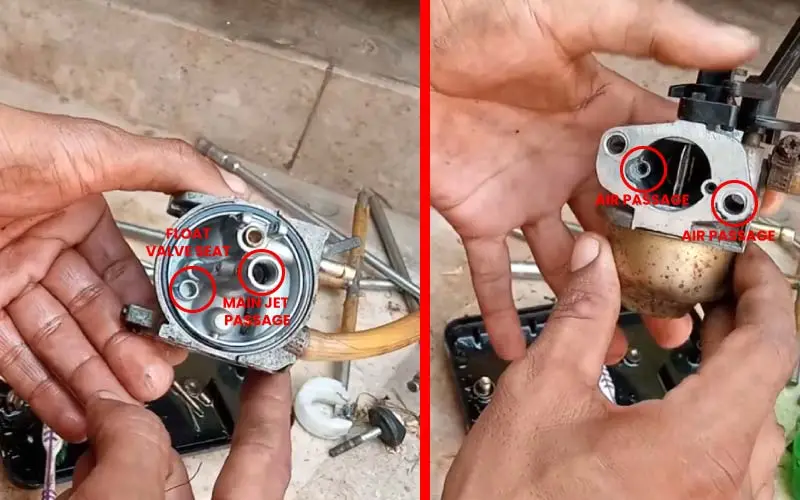
The passages inside the main jet and pilot jet should also be cleaned. Apply a few sprays of carb cleaner through those passages along with the float valve.
Use cotton buds if necessary but those airways and tiny passages need to be cleaned.
Step 10: Reassemble the Carburetor:
Before reassembling, make sure the main jet and pilot jets are sitting properly in their positions. Don’t screw them super tight. A few turns should do it. Now reassemble everything.
Below is the video to clean the carburetor of an inverter generator:
Below is the video about how to clean a carburator of an open frame generator:
Is It Necessary to Clean a Generator’s Carburetor?
Cleaning a carburetor prevents corrosion buildup. The air intake dries out the gasoline inside the walls, resulting in a sticking substance. This sticky substance needs to be cleaned to maintain efficiency and smooth running.
A gummed or clogged carburetor doesn’t let the proper air-fuel mixture get into the combustion chamber, resulting in generator misfires. If you don’t clean your carburetor in time, your generator won’t produce any power. Your generator will not start at all in the worst case if the carburetor is all gummed up.
What Are The Signs of a Bad Carburetor?
- Engine Stalling
- Engine Surging
- Poor Fuel Economy
- Hard to Start Engine
- Engine Misfiring
- Black Smoke from Exhaust
- Carburetor Flooding (Overflow of fuel from carburetor)
- High Engine RPMs at idle.
1. Engine Stalling:
If the carburetor is not delivering the correct amount of fuel to the engine, it can cause the engine to stall, especially when coming to a stop.
2. Engine Surging:
Engine surging is a fluctuation in engine RPM, causing the vehicle to speed up and slow down without driver input. Sudden voltage drop is also dangerous for sensitive appliances like cellphones, cameras, and laptops. A bad carburetor can cause the engine to receive too much or too little fuel, leading to this issue.
Recommended Read: Generator under Voltage: Causes and Fixes
3. Poor Fuel Economy:
If the carburetor is not properly calibrated, it can cause the engine to use more fuel than necessary, leading to poor fuel economy.
4. Hard to Start Engine:
A carburetor that is clogged or not functioning properly can cause difficulty starting the engine. The carburetor is responsible for delivering fuel to the engine to start it, so if it’s not functioning correctly, starting the engine can be a problem.
5. Engine Misfiring:
Engine misfiring is a situation where the combustion intakes an unbalanced air-fuel mixture ratio or the engine runs unevenly or fails to fire at all. A bad carburetor can cause the engine to receive too much or too little fuel, leading to misfires.
6. Black Smoke from Exhaust:
Due to unbalanced air-fuel mixture, it can cause the engine to burn fuel inefficiently, leading to black smoke from the exhaust.
7. Flooding (Overflow of fuel from carburetor):
Flooding occurs when too much fuel is delivered to the engine, and it floods the engine. This can happen if the carburetor is clogged or not functioning properly.
8. High Engine RPMs at idle:
A carburetor that is not adjusted correctly can cause the engine RPMs to be too high at idle. This can cause the engine to run roughly and be difficult to control.
How Do I Keep My Generator From Gumming Up?
- Store fuel properly: Store fuel in a clean, airtight container, away from heat and moisture to prevent degradation.
- Run the generator regularly: Running the generator regularly helps to keep the carburetor and fuel system clean.
- Use fuel stabilizer: Fuel stabilizer helps to prevent fuel from breaking down and becoming contaminated.
- Perform regular maintenance – Regularly cleaning or replacing air filters and spark plugs can prevent build-up in the carburetor and fuel system.
- Turn off the fuel valve when not in use: This helps prevent fuel from evaporating and leaving residue in the carburetor.
- Use a higher grade of fuel: Higher-quality fuel is less likely to leave deposits and clog up the carburetor. It is not necessary but if you can afford it, you should use it. Read this research if you want to know more about high-grade fuels.
- Drain the carburetor: If the generator has not been used for an extended period, drain the old gasoline from the carburetor to prevent stale fuel from gumming up the system.
Verdict
It is not that difficult to clean a carburetor it is a little bit technical. All it takes is a few screwdrivers and a carb cleaner.
You don’t have to remove all the parts, you can clean them by removing the body and a few parts. Be generous with the carb cleaner sprays.
Frequently Asked Questions (FAQs)
Can I dump the carb cleaner into the generator?
You can dump the carb cleaner into the generator. A few sprays will be enough to clean the emulsion tube, carburetor bow, and jets.
Can I Use WD40 as a carb cleaner?
WD40 is not a carb cleaner. It is a light lubricant and a water dispersant. Its best is used to clean corrosion. You also use it in advance on the metal to prevent rusting
Where do I spray Carb Cleaner?
Following are the best spots to use a carb cleaner.
-Carburetor body
-Main jet
-Pilot jet holes
-Float pin and float valve
-Float bowl
-Jets and airways
What chemical is used to clean the carburetor?
Commonly used chemicals for cleaning carburetors include:
1. Trichloroethylene
2. Toluene
3. Acetone
4. Brake cleaner
5. Carburetor cleaner spray
6. Mineral spirits
7. Ethanol
8. Methyl ethyl ketone (MEK).

Kashif has been a valuable asset to the electric generator industry for over 5 years. Now, As a skilled energy engineer, he’s been on the front lines of diagnosing problems, fixing broken parts, and performing routine maintenance tasks to keep generators running smoothly.
